Elektronik: Unterschied zwischen den Versionen
Aus Wiki_2020
Wezi (Diskussion | Beiträge) Keine Bearbeitungszusammenfassung |
Wezi (Diskussion | Beiträge) |
||
| (18 dazwischenliegende Versionen desselben Benutzers werden nicht angezeigt) | |||
| Zeile 1: | Zeile 1: | ||
== Elektronik == | == Elektronik == | ||
=== Bauelemente === | |||
*[https://www.mikrocontroller.net/articles/MOSFET-%C3%9Cbersicht MOSFET Übersicht] | |||
=== Datasheets === | === Datasheets === | ||
<div style="column-count: | <div style="column-count:2"> | ||
*Analog | |||
*[https://www.analog.com/media/en/technical-documentation/data-sheets/4015fb.pdf Multichemistry Buck Battery Charger Controller with Digital Telemetry System]<br> | **[https://www.analog.com/media/en/technical-documentation/data-sheets/4015fb.pdf Multichemistry Buck Battery Charger Controller with Digital Telemetry System]<br> | ||
----------------- | |||
*[https://www.diodes.com/assets/Datasheets/AP22913.pdf AP22913 Highsideswitch 1,4..5V]<br> | *Diodes | ||
**[https://www.diodes.com/assets/Datasheets/AP22913.pdf AP22913 Highsideswitch 1,4..5V]<br> | |||
*[https://www.holtek.com/productdetail/-/vg/73xx HT7333 3,3V LDO] | ----------------- | ||
*Holtek | |||
*[https://ww1.microchip.com/downloads/en/devicedoc/20001952c.pdf MCP23017 16Bit Portexpander I²C] | **[https://www.holtek.com/productdetail/-/vg/73xx HT7333 3,3V LDO] | ||
----------------- | |||
*[https://www.nxp.com/docs/en/data-sheet/PCF8574_PCF8574A.pdf PCF8574P 8Bit Portexpander I²C] | *Microchip | ||
**[https://ww1.microchip.com/downloads/en/devicedoc/20001952c.pdf MCP23017 16Bit Portexpander I²C] | |||
*[https://www.st.com/resource/en/datasheet/ld1117.pdf LD1117] Festspannungsregler Low Dropout (1V) | ----------------- | ||
*NXP | |||
**[https://www.nxp.com/docs/en/data-sheet/PCF8574_PCF8574A.pdf PCF8574P 8Bit Portexpander I²C] | |||
----------------- | |||
*ST | |||
**[https://www.st.com/resource/en/datasheet/ld1117.pdf LD1117] Festspannungsregler Low Dropout (1V) | |||
----------------- | |||
*JST | |||
**[https://www.jst-mfg.com/product/index.php?series=277 JST-HX Connectors] | |||
</div> | </div> | ||
--------------------------------------------------------- | |||
=== Messtechnik === | === Messtechnik === | ||
| Zeile 65: | Zeile 73: | ||
=== Online Design Tools === | === Online Design Tools === | ||
*[https://logigator.com/ Logigsimulator] | |||
*[https://www.snapmagic.com/ AI-PCB Tool] | |||
*[http://www.ti.com/lsds/ti/analog/powermanagement/reference_design.page Texas Instruments Power Management] | *[http://www.ti.com/lsds/ti/analog/powermanagement/reference_design.page Texas Instruments Power Management] | ||
*[http://www.analog.com/en/content/Signal_Chain_Designer/fca.html Analog Devices Signal Chain Designer ] | *[http://www.analog.com/en/content/Signal_Chain_Designer/fca.html Analog Devices Signal Chain Designer ] | ||
| Zeile 135: | Zeile 144: | ||
*[http://wizwiki.net/wiki/doku.php?id=products:wiz550io:start Wiznet wiz550io] | *[http://wizwiki.net/wiki/doku.php?id=products:wiz550io:start Wiznet wiz550io] | ||
*[https://github.com/Wiznet/WIZ_Ethernet_Library/tree/master c-Code Arduino IDE] | |||
==== Serial ==== | ==== Serial ==== | ||
| Zeile 150: | Zeile 160: | ||
==== Neopixel (WS2812) ==== | ==== Neopixel (WS2812) ==== | ||
*adrianotiger.github.io/Neopixel-Effect-Generator/ | |||
*[http://www.mikrocontroller.net/topic/322375 PIC12/PIC18/PIC24 WS2812 SPI Library] | *[http://www.mikrocontroller.net/topic/322375 PIC12/PIC18/PIC24 WS2812 SPI Library] | ||
*[http://thesignalpath.com/blogs/2014/07/14/watcheditdeletetutorial-on-programming-the-neopixel-ws2812-rgb-leds-equipment-giveaway/ programming the neopixel] | *[http://thesignalpath.com/blogs/2014/07/14/watcheditdeletetutorial-on-programming-the-neopixel-ws2812-rgb-leds-equipment-giveaway/ programming the neopixel] | ||
| Zeile 165: | Zeile 175: | ||
*[http://www.digital-enlightenment.de/usbdmx.htm USBDMX digital-enlightenment] | *[http://www.digital-enlightenment.de/usbdmx.htm USBDMX digital-enlightenment] | ||
*[http://ftpusuarios.ono.com/freedmx/index.html Manolator dmx512] | *[http://ftpusuarios.ono.com/freedmx/index.html Manolator dmx512] | ||
*[ | *[https://wiki-de.dmxcontrol-projects.org/index.php?title=Unterst%C3%BCtzte_Interfaces Interfaces DMX Control] | ||
*[http://dmxchaser.de/v2/index.html RS232] | *[http://dmxchaser.de/v2/index.html RS232] | ||
*[http://web.archive.org/web/20090124122934/http://dworkin-dmx.de/#dworkin-dmx Seriell/USB 2 DMX] | *[http://web.archive.org/web/20090124122934/http://dworkin-dmx.de/#dworkin-dmx Seriell/USB 2 DMX] | ||
*Artnet | |||
**[https://www.lightjams.com/artnetominator/ Artnet Debugger/Monitor] | |||
**[https://chamsyslighting.com/ DMX Software free] | |||
**[https://github.com/signorettae/ESP32-ArtNet-to-DMX ESP32 ArtNet to DMX] | |||
== Embedded == | == Embedded == | ||
| Zeile 176: | Zeile 190: | ||
===== PiPico ===== | ===== PiPico ===== | ||
*https://github.com/elehobica/pico_spdif_rx | *https://github.com/elehobica/pico_spdif_rx | ||
* [https://www.hackster.io/bjnhur/how-to-add-w5500-ethernet-to-raspberry-pi-pico-python-2-77c78c how to add w5500 ethernet to raspberry pi pico ] | |||
===== Pi ===== | ===== Pi ===== | ||
*[https://raspberrytips.com/anaconda-on-raspberry-pi/ anaconda on raspberry pi ]<br> | |||
*https://www.strobelstefan.de/blog/2020/12/01/e-mail-versand-fuer-den-raspberry-pi-konfigurieren/<br> | |||
*https://www.raspberrytips.com/python-send-emails-raspberry-pi/<br> | |||
*https://forums.raspberrypi.com/viewtopic.php?t=330432 Desktop keine Menüleiste etc.<br> | *https://forums.raspberrypi.com/viewtopic.php?t=330432 Desktop keine Menüleiste etc.<br> | ||
*https://www.heise.de/hintergrund/Raspi-als-Samba-Server-konfigurieren-4903166.html | *https://www.heise.de/hintergrund/Raspi-als-Samba-Server-konfigurieren-4903166.html | ||
| Zeile 202: | Zeile 221: | ||
===== Hardware Erweiterungen ===== | ===== Hardware Erweiterungen ===== | ||
https://raspiaudio.com/produit/audio | *[https://forum-raspberrypi.de/forum/thread/62938-kurzanleitung-zur-inbetriebnahme-einer-pi-cam-ab-bookworm/ PiCamera@ pizero2W Bookwoorm64] | ||
https://raspiaudio.com/produit/audio<br> | |||
update bookworm 64bit follow this steps: | |||
'' | |||
Edit the config.txt file or, in Pi OS, type: | |||
sudo nano /boot/firmware/config.txt<br> | |||
comment out the line: | |||
#dtparam=audio=on<br> | |||
Add the line at the end of the file: | |||
dtoverlay=hifiberry-dac<br> | |||
Save and reboot your system.'' | |||
===== Befehle ===== | ===== Befehle ===== | ||
Aktuelle Version vom 27. November 2024, 21:28 Uhr
Elektronik
Bauelemente
Datasheets
Messtechnik
- UNI-T UT61E
- DMM Kalibrieren
Projects
To be categorized
Antennen
Hardware
PCB
- Leiterplattenfertiger Bulgarien
- SamacSys PCB SChematic Librarys
- Samacsys new
- PCB Schematic Componentsearch
Joule Thief
- Joule thief
- joule thief based Solarlight
- some theoretics
- QUANTSUFF'S CIRCUIT PAGE
- 300mV Step-Up Wandler
- [2]
Online Design Tools
- Logigsimulator
- AI-PCB Tool
- Texas Instruments Power Management
- Analog Devices Signal Chain Designer
- Online circuit editor & Simulator
RGB
LED
RC Modellbau
Messzeugs
Wireless
Unterhaltungselektronik
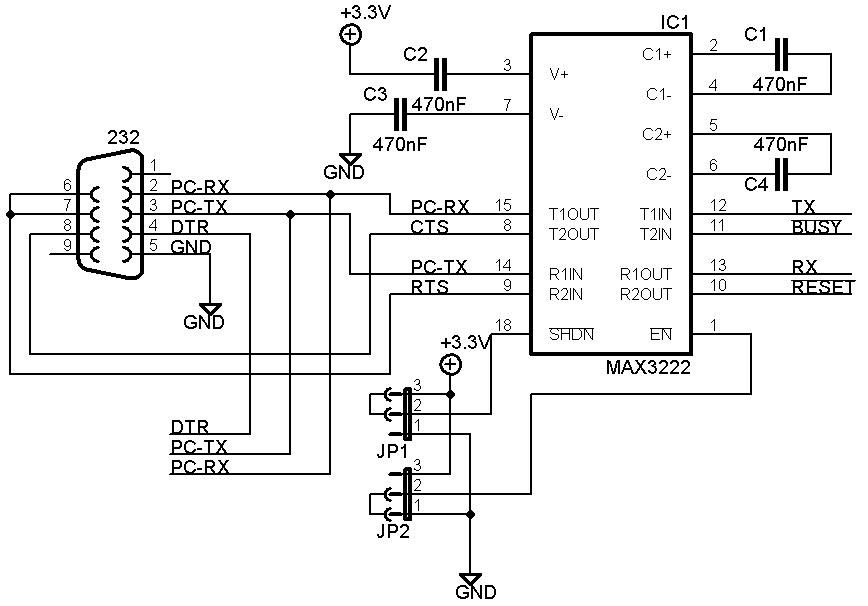
Wandler RS232 auf 3,3V Logigpegel
Allgemeines Wissen
- Resources and Analyses for Electronic Engineers
- HP-Museum
- TI-Museum
- allerlei Software/Hardware
- Advanced Serial Protocol Analyzer 232Analyzer [RS232, Diagnose, Software]
- Device Monitoring Studio [RS232, Diagnose, Software]
Communication
NP2M e*message
I²C
- ADS1115
 4channel 16bit ADC ADS1115  https://learn.adafruit.com/adafruit-4-channel-adc-breakouts
 Beispiel https://smartypies.com/projects/ads1115-with-raspberrypi-and-python/
 Datasheet https://cdn-shop.adafruit.com/datasheets/ads1115.pdf
- PCF8591
 AD/DA Wandler 8bit  http://cool-web.de/raspberry/raspi-ad-wandler-pcf8591-ueber-i2c-bus-ansteuern.htm
 AD/DA Wandler 8bit  http://bristolwatch.com/rpi/pcf8591.html
Ethernet
Serial
1-Wire BUS
- Onewire Project
- identify Fake DS18B20
- technical Description
- GUIDELINES FOR RELIABLE LONG LINE 1-WIRE NETWORKS
- Appnote 1-Wire
- Overview of 1-Wire Technology and Its Use
- 1-WIRE LIBRARY FOR P12,16 AND 18 SINGLE AND MULTIDROP DEV.
Neopixel (WS2812)
- adrianotiger.github.io/Neopixel-Effect-Generator/
- PIC12/PIC18/PIC24 WS2812 SPI Library
- programming the neopixel
- WS2812 -Protokoll in Detail
- ws2811 CCS C-Code
- [3]
- NeoPixels Revealed: How to (not need to) generate precisely timed signals
- Madison's NeoClock - A PIC + KiCAD + NeoPixel adventure
- A simple, efficient SPI front-end for NeoPixels
- {https://www.elektormagazine.de/news/spi-zu-ws2812b-konverter-mehr-leds-mehr-leistung?utm_source=Elektor+Deutschland&utm_campaign=ee880f7954-EMAIL_CAMPAIGN_3_10_2022_9_41&utm_medium=email&utm_term=0_7096e266f6-ee880f7954-234235097&mc_cid=ee880f7954&mc_eid=d69e41c3cb SPI 2 Neopixl Converter]
DMX
Embedded
PIC
PIC- alles zu PIC Microcontrollern
Raspberry Pi
PiPico
Pi
- anaconda on raspberry pi
- https://www.strobelstefan.de/blog/2020/12/01/e-mail-versand-fuer-den-raspberry-pi-konfigurieren/
- https://www.raspberrytips.com/python-send-emails-raspberry-pi/
- https://forums.raspberrypi.com/viewtopic.php?t=330432 Desktop keine Menüleiste etc.
- https://www.heise.de/hintergrund/Raspi-als-Samba-Server-konfigurieren-4903166.html
- https://nerdiy.de/de_de/raspberrypi-ordner-freigeben-und-unter-windows-als-netzlaufwerk-einbinden/ Netzwerkfreigabe Samba
- i2c http://www.avsk.net/fileadmin/redakteure/Dateien/Raspberry_Workshop/Erläuterungen_zur_Konfiguration_des_I2C.pdf
- python https://pypi.org/project/smbus2/
- https://test-wetterstation.de/temperaturmessung-mit-dem-raspberry-pi
- Raspi http://www.netzmafia.de/skripten/hardware/RasPi/RasPi_Install.html#DeviceTree
- 1 Wire http://www.netzmafia.de/skripten/hardware/RasPi/Projekt-Onewire/index.html
- Raspi Pressuresensor https://ciaduck.blogspot.com/2014/12/mpl3115a2-sensor-with-raspberry-pi.html
- Raspi Weatherstation [4]
- Hostname ändern https://www.howtogeek.com/167195/how-to-change-your-raspberry-pi-or-other-linux-devices-hostname/
- https://tightdev.net/category/Python Pi aufsetzen
- pibased securitysystem https://blog.haschek.at/2018/raspberry-pi-plus-deep-learning-security-system.html
- Raspi readonly filesystem https://hallard.me/raspberry-pi-read-only/
- personal Raspidatacenter [5]
- PI Phyton
https://learn.sparkfun.com/tutorials/python-programming-tutorial-getting-started-with-the-raspberry-pi/all
http://www.netzmafia.de/skripten/hardware/RasPi/
https://www.raspberrypi-spy.co.uk/2013/03/raspberry-pi-1-wire-digital-thermometer-sensor/
https://learn.adafruit.com/raspberry-pi-care-and-troubleshooting
https://raspberrypiuser.co.uk/display-system-info-on-your-raspberry-pi-using-conky
Hardware Erweiterungen
https://raspiaudio.com/produit/audio
update bookworm 64bit follow this steps:
Edit the config.txt file or, in Pi OS, type:
sudo nano /boot/firmware/config.txt

comment out the line:
#dtparam=audio=on

Add the line at the end of the file:
dtoverlay=hifiberry-dac

Save and reboot your system.
Befehle
- Prozessliste: top , htop
- Systeminformationen ausgeben uname -a
- Nutzer- und Gruppeninformationen id
Autostart
- Autostart 5 Methoden
- Desktop
- https://christian-brauweiler.de/autostart-unter-raspbian/
- Autostart Varianten
- Autostart VariantenII
* funktionierende Variante unter Buster

 1. in  /home/pi/.config/lxsession/LXDE-pi/ Datei autostart erstellen
 2. autostart editieren

@lxpanel --profile LXDE-pi
@pcmanfm --desktop --profile LXDE-pi
@lxterminal --geometry=125x25 -e "/home/pi/Python/Sensehat_temperature.py"
@lxterminal --geometry=60x24 -e "/home/pi/Python/ADSB_Flights22bup.py"
@xscreensaver -no-splash
point-rpi
Backup
https://www.linux-tips-and-tricks.de/en/quickstart-rbk/
https://forum.planefinder.net/threads/cloning-booted-rpi’s-microsd-card-if-rpi-is-physically-accessable.1360/#post-9559
1. Install
 git clone https://github.com/billw2/rpi-clone.git
 cd rpi-clone
 sudo cp rpi-clone rpi-clone-setup /usr/local/sbin

2. Device für Clone ermitteln:
 pi@raspizeropihole:~ $ lsblk
 NAME        MAJ:MIN RM  SIZE RO TYPE MOUNTPOINT
 sdb           8:16   1 14.6G  0 disk
 ├─sdb1        8:17   1  256M  0 part
 └─sdb2        8:18   1 14.4G  0 part
 mmcblk0     179:0    0 14.6G  0 disk
 ├─mmcblk0p1 179:1    0  256M  0 part /boot
 └─mmcblk0p2 179:2    0 14.4G  0 part /

3. hier ist es sdb ==》
pi@raspizeropihole:~ $ sudo rpi-clone sdb
Booted disk: mmcblk0 15.7GB                Destination disk: sdb 15.7GB
---------------------------------------------------------------------------
Part      Size    FS     Label           Part   Size    FS     Label
1 /boot   256.0M  fat32  --              1      256.0M  fat32  --
2 root     14.3G  ext4   rootfs          2       14.3G  fat32  --
---------------------------------------------------------------------------
== Initialize: IMAGE partition table - FS types conflict ==
1 /boot               (47.5M used)   : MKFS  SYNC to sdb1
2 root                (2.8G used)    : RESIZE  MKFS  SYNC to sdb2
---------------------------------------------------------------------------
Run setup script       : no.
Verbose mode           : no.
-----------------------:
** WARNING **          : All destination disk sdb data will be overwritten!
-----------------------:
Initialize and clone to the destination disk sdb?  (yes/no): y
Optional destination ext type file system label (16 chars max): pihole311021
Initializing
  Imaging past partition 1 start.
  => dd if=/dev/mmcblk0 of=/dev/sdb bs=1M count=8 ...
  Resizing destination disk last partition ...
    Resize success.
  Changing destination Disk ID ...
  => mkfs -t vfat -F 32  /dev/sdb1 ...
  => mkfs -t ext4 -L pihole311021 /dev/sdb2 ...
Syncing file systems (can take a long time)
Syncing mounted partitions:
  Mounting /dev/sdb2 on /mnt/clone
  => rsync // /mnt/clone with-root-excludes ...
  Mounting /dev/sdb1 on /mnt/clone/boot
  => rsync /boot/ /mnt/clone/boot  ...
Editing /mnt/clone/boot/cmdline.txt PARTUUID to use 0d374dbf
Editing /mnt/clone/etc/fstab PARTUUID to use 0d374dbf
===============================
Done with clone to /dev/sdb
   Start - 17:00:06    End - 17:57:19    Elapsed Time - 57:13
Cloned partitions are mounted on /mnt/clone for inspection or customizing.
Hit Enter when ready to unmount the /dev/sdb partitions ...
  unmounting /mnt/clone/boot
  unmounting /mnt/clone
===============================
Cleanup / free Diskspace
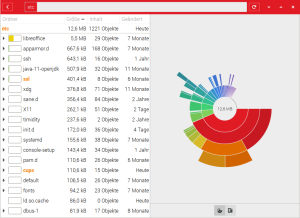
- use Baobab for graphical View at diskusage (Dateimanager Rechte Mousetaste Festplattennutzung)

- sudo apt-get autoclean (apt Cache von unnütz gecachten .deb Packages cleanen)
Doku
- GPIO Pinout
- running the command 'pinout'
Monitoring
- https://www.alexhyett.com/grafana-raspberry-pi/
- https://jvde2019.grafana.net/d/LoCOaVGMk/node-exporter-from-agent-integration?orgId=1&from=now-5m&to=now
- https://opensource.com/article/21/3/raspberry-pi-grafana-cloud
- https://grafana.com/docs/grafana-cloud/quickstart/agent_linuxnode/
- [6]
- https://developer-blog.net/raspberry-pi-monitoring-mit-grafana/
- https://grafana.com/grafana/download?pg=get&plcmt=selfmanaged-box1-cta1&platform=arm
Anwendungen
- https://www.electromaker.io/tutorial/blog/how-to-stream-spotify-on-raspberry-pi Spotyfy Free DRM
- https://www.hackster.io/shahizat005/smart-control-of-raspberry-pi-fan-using-python-thingspeak-4841b2 Intelligente Kühlung
- https://www.raspberry-pi-geek.de/ausgaben/rpg/2013/06/die-raspberry-pi-hardware-optimal-ausreizen/
- https://electreeks.de/project/spy-agent-bild-erkennung-objekterkennung-tool/ Bilderkennubg KI
- https://picockpit.com Remotetool
- https://elinux.org/RPi_Hub
- https://raspberrytips.com/backup-raspberry-pi/#To_Windows_computer
- https://dietpi.com
- http://wlankamera24.net/blog/raspberry-pi-ueberwachungskamera/
- https://afterhourscoding.wordpress.com/2017/09/06/using-supervisord-and-tmpfs-ramdisks-on-a-raspberry-pi/ Supervisord TMPFS
OLED Python
- https://webnist.de/i2c-oled-display-mit-python-am-raspberrypi/
- https://pypi.org/project/oled-text/
- https://github.com/markusk/minibot/blob/master/test/lcd_test.py
GPIO-Interrupt
- http://www.netzmafia.de/skripten/hardware/RasPi/RasPi_GPIO_int.html
- https://www.kampis-elektroecke.de/raspberry-pi/raspberry-pi-gpio/interrupts/
SPI-RFID/NFC
- https://tutorials-raspberrypi.com/reading-out-raspberry-pi-rfid-rc522-tags-nfc/
- https://www.electroniclinic.com/raspberry-pi-rfid-rc522-nfc-reader-tags-scanner-python-code/
- https://lastminuteengineers.com/how-rfid-works-rc522-arduino-tutorial/
- https://pimylifeup.com/raspberry-pi-rfid-rc522/
Dateisystem
- mit ext4 formatieren mkfs -t ext4 /dev/sda1
- USB Stick automatisch mounten https://www.elektronik-kompendium.de/sites/raspberry-pi/1911271.htm
- http://s6z.de/cms/index.php/raspberry-pi/52-usb-stick-einbinden
# sudo apt-get install ntfs-3g hfsutils hfsprogs
Netzwerk
- DHCPCD Manual (static IP)
- Netzwerkprobleme lösen
- MAC-Adresse
- Internetzugriff
- WLAN
- LAN & WLAN konfigurieren
System
- Betriebssystem herausfinden cat /etc/os-release
uname -a  gibt es alles aus, was es über ihr Linux weiß
cat /proc/version
cat /etc/*-release
- Terminalemulation auswähler
- Backup SD-Card Roadkil's DiskImage V1.6
- Clone SD Card from working System
Pihole
- https://linuxundich.de/raspberry-pi/linux-images-fuer-den-raspberry-pi-auf-sd-karte-installieren/
- https://sccmchris.com/2018/03/21/creating-a-headless-dns-based-adblocker-with-pihole-on-a-raspberry-pi-zero-w/
- http://yannickloriot.com/2016/04/install-mongodb-and-node-js-on-a-raspberry-pi/ MongoDB
- remote control with weaved
- AV-Connector
- Webcam mit RaspberryPi
- https://www.bitblokes.de/sd-karte-des-raspberry-pi-sichern-dd-oder-partclone/
- http://kompf.de/weather/pibaro.html
- https://tutorials-raspberrypi.de/raspberry-pi-sensoren-uebersicht-die-50-wichtigsten-module/
- https://pi-hole.net/2017/02/22/what-really-happens-on-your-network-find-out-with-pi-hole/
- https://jankarres.de/uebersicht-aller-raspberry-pi-artikel/
piholesetup
- download https://www.raspberrypi.com/software/operating-systems/#raspberry-pi-os-32-bit Raspberry Pi OS Lite
- flash image mit etcher
- bootfs partition leere Datei ssh erstellen
Kodi
Kali
Systemsetup
Displays
Sensorik
Stromsensor Hallbasiert
RFID / NFC
- https://www.az-delivery.de/products/rfid-set?_pos=7&_sid=42a70d516&_ss=r
- https://tutorials-raspberrypi.de/raspberry-pi-rfid-rc522-tueroeffner-nfc/
